
- A stop loss should be placed where your trade idea is proven wrong — not at an arbitrary pip distance
- Take profit should be set before entry, anchored to real chart structure or a defined risk-reward multiple
- Position size is calculated from stop distance and account risk, so the stop comes first and lot size second
- A wider stop is not riskier if you shrink the position to keep the dollar risk constant
- No placement method removes losses; the goal is surviving losing streaks and keeping average winners larger than average losers
- Practical Answer Framework
- Short Answer
- Detailed Explanation
- Example
- Common Mistake
- Professional Tip
- Why Stop Loss and Take Profit Placement Matters More Than Entry
- Direct Answer: How to Set Stop-Profit and Stop-Loss Levels
- First Principle: The Stop Comes Before the Position Size
- Method 1: Structure-Based Stops (Most Reliable Starting Point)
- Method 2: ATR-Based Stops (Adapting to Volatility)
- Method 3: Take Profit by Risk-Reward Multiple
- Why Risk-Reward Changes Everything
- Trade Management: What to Do While the Trade Is Live
- Common Mistakes That Quietly Drain Accounts
Affiliate & risk disclosure: ForexTradeLab may earn a commission from qualifying broker links. This does not change the price paid or replace independent checks. See the affiliate disclosure and risk disclaimer.
Practical Answer Framework#
Short Answer
Set your stop-loss at the price level that proves your trade idea wrong, usually just beyond a recent swing high/low or support/resistance zone with a small volatility buffer. Set your stop-profit or take-profit before entry at the next realistic structure level or at a fixed risk-reward multiple such as 1:2. Then calculate position size so the stop distance equals only 1–2% of your account. The stop defines the risk; never widen it after entry to avoid a loss.
Detailed Explanation
How to set stop-loss and take-profit levels using structure, ATR, volatility and risk-reward rules — without arbitrary pip distances.
Example
$1,000 | $10 | 20 pips | ~0.05 lot (EUR/USD)
Common Mistake
Do not widen a stop to avoid a loss. This is the single most account-destroying habit.
Professional Tip
Use this carefully; too-tight breakeven stops get clipped by noise.
Why Stop Loss and Take Profit Placement Matters More Than Entry#
Most beginners obsess over the entry — the perfect indicator cross, the exact candle to buy. But where you place your stop loss and take profit usually decides whether a strategy is profitable, not the entry itself.
Direct Answer: How to Set Stop-Profit and Stop-Loss Levels#
In trading, "stop-profit" usually means take profit: a pre-set exit that closes the trade when price reaches your planned profit target. A complete trade plan has both sides:
| Level | Purpose | Practical placement method |
|---|---|---|
| Stop-loss | Limits the loss if the idea fails | Just beyond invalidation: below support for longs, above resistance for shorts |
| Stop-profit / take-profit | Locks in the planned gain | At the next support/resistance target or a fixed 1:1.5 to 1:3 risk-reward level |
For a long trade, a simple process is:
- Mark the entry zone.
- Place the stop-loss below the swing low or support zone, plus a small spread/volatility buffer.
- Measure the risk distance in pips.
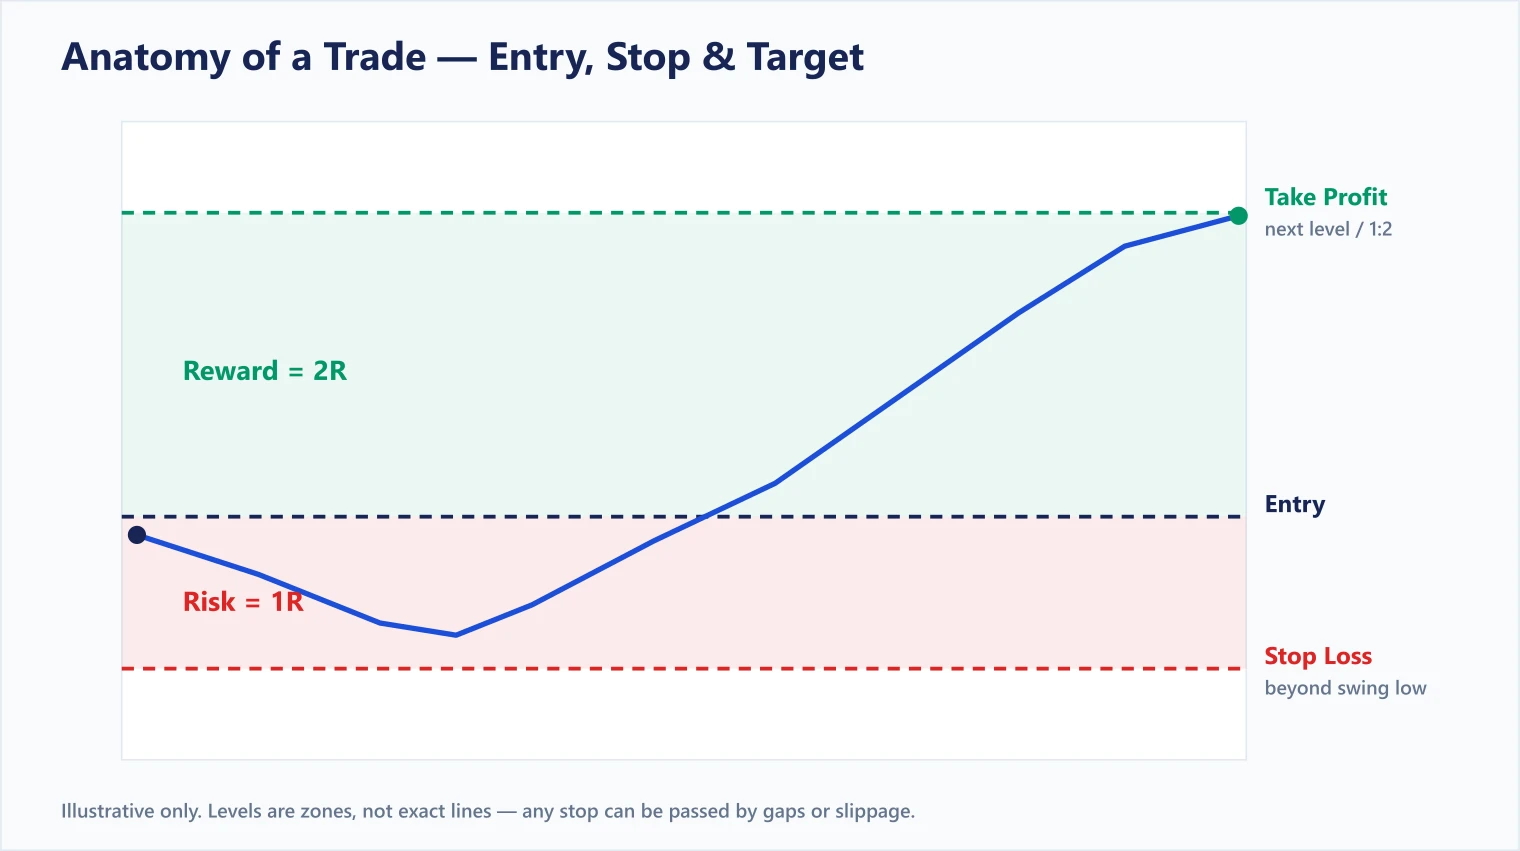
- Place the take-profit at the next resistance level or at 2× the risk distance.
- Reduce lot size if the stop is wide so the account risk stays fixed.
For a short trade, reverse the logic: the stop goes above invalidation and the target goes near the next support zone.
The reason is simple: your entry determines if you are right; your exits determine how much you make when right and lose when wrong. A trader can be correct 45% of the time and still grow an account if winners are consistently larger than losers. The opposite — being right often but letting losers run — is how most accounts bleed out.
This article is educational only. It is not investment advice or a promise of results. Execution, spreads, and gap behaviour depend on your broker, account type, and jurisdiction. Test everything on a demo first.
First Principle: The Stop Comes Before the Position Size#
This is the step beginners reverse. The correct order is:
- Find where your idea is wrong. That price level is your stop loss.
- Measure the distance from entry to that stop (in pips).
- Decide your risk in money terms (e.g. 1% of the account).
- Calculate position size so the stop distance equals that risk amount.
Doing it this way means a wider stop is not automatically riskier — you simply trade a smaller position. The dollar risk stays constant. For the full framework on the 1–2% rule and position sizing, see our forex risk management guide.
| Account | Risk (1%) | Stop distance | Approx. position size |
|---|---|---|---|
| $1,000 | $10 | 20 pips | ~0.05 lot (EUR/USD) |
| $1,000 | $10 | 50 pips | ~0.02 lot (EUR/USD) |
| $5,000 | $50 | 25 pips | ~0.20 lot (EUR/USD) |
Pip value varies by pair and lot size; always confirm on your platform before sizing.
Method 1: Structure-Based Stops (Most Reliable Starting Point)#
The most robust approach places the stop just beyond a meaningful level — a recent swing high/low, or a support/resistance zone that, if broken, invalidates your trade.
- Long trade: place the stop below the recent swing low or support, plus a small buffer.
- Short trade: place the stop above the recent swing high or resistance, plus a buffer.
The buffer matters. Price routinely pierces a level by a few pips before reversing (a "stop hunt" or simply noise). Placing the stop exactly on the level invites getting clipped. To understand where these levels come from, read our support and resistance trading guide.
Method 2: ATR-Based Stops (Adapting to Volatility)#
A fixed "30 pip stop" ignores that EUR/USD on a quiet afternoon behaves nothing like GBP/JPY around a news release. The Average True Range (ATR) indicator measures recent volatility, so you can scale stops to current conditions.
A common approach: set the stop at 1.5× to 2× the ATR away from entry.
- In a calm market, ATR is small → tighter stop → larger position.
- In a volatile market, ATR is large → wider stop → smaller position.
This keeps your stop outside normal "breathing room" without guessing. ATR is covered alongside other tools in our forex indicators explained guide.
Method 3: Take Profit by Risk-Reward Multiple#
Your take profit should be defined before entry, not improvised while the trade is open. Two main approaches:
A. Structure-based take profit — target the next significant level (prior swing, support/resistance, round number where order flow clusters). Realistic, because price often stalls at these zones.
B. Fixed risk-reward multiple — if your stop is 30 pips away, a 1:2 target is 60 pips. This enforces discipline and lets you stay profitable below a 50% win rate.
Why Risk-Reward Changes Everything#
| Risk-Reward | Win rate needed to break even |
|---|---|
| 1:1 | 50% |
| 1:1.5 | 40% |
| 1:2 | ~33% |
| 1:3 | 25% |
At 1:2, you can lose two out of every three trades and still break even. This is why professionals tolerate frequent small losses — their winners are structurally larger.
Trade Management: What to Do While the Trade Is Live#
- Do not widen a stop to avoid a loss. This is the single most account-destroying habit. The stop was your defined "I'm wrong" point — honour it.
- Consider moving to breakeven once price travels a sensible distance in your favour, so a winner cannot turn into a loser. Use this carefully; too-tight breakeven stops get clipped by noise.
- Trailing stops can lock in gains during strong trends but will exit you early in choppy conditions. They are a tool, not a free lunch.
- Partial take profit — closing part of the position at 1:1 and letting the rest run to 1:3 — is a common compromise between banking gains and capturing trends.
Common Mistakes That Quietly Drain Accounts#
- Round-number stops ("I'll risk 20 pips") unrelated to the chart.
- No take profit plan, so winners are closed in fear and losers held in hope.
- Stops too tight, clipped by normal volatility before the move plays out.
- Moving the stop further away when price approaches it.
- Mental stops ("I'll close it manually") that never get honoured under pressure.
- Ignoring spread and slippage — your effective stop is slightly worse than the chart level, especially around news. See forex market hours, liquidity and slippage.
Practise before live trading: Review XM account options — demo accounts with MT4/MT5 order management can help you rehearse stop and take-profit placement before risking real capital. Check the legal entity and current terms before depositing.
Risk warning: Forex and CFD trading carries a high risk of loss. Most retail traders lose money. A stop loss reduces but does not eliminate risk — gaps and slippage can fill orders worse than your level, especially over weekends or during news. Leverage magnifies both gains and losses. Only trade money you can afford to lose.
Comments
Add a useful note for other traders. We review comments before publishing.